Dart 中的併發
Dart 透過 async-await、isolate 以及一些非同步型別概念(例如 Future 和 Stream)支援了併發程式碼程式設計。本篇文章會對 async-await、Future 和 Stream
進行簡略的介紹,而側重點放在 isolate 的講解上。
在應用中,所有的 Dart 程式碼都在 isolate 中執行。每一個 Dart 的 isolate 都有獨立的執行執行緒,它們無法與其他 isolate 共享可變物件。在需要進行通訊的場景裡,isolate 會使用訊息機制。很多 Dart 應用都只使用一個 isolate,也就是 main isolate。你可以建立額外的 isolate 以便在多個處理器核心上執行並行程式碼。
儘管 Dart 的 isolate 模型設計是基於作業系統提供的處理序和執行緒等更為底層的原語進行設計的, Dart 虛擬機器對其的使用是一個具體的實現,在本篇文章中,我們不對其具體實現展開討論。
非同步的型別和語法
如果你已經對 Future、Stream 和 async-await 比較熟悉了,可以直接跳到 isolate 部分 進行閱讀。
Future 和 Stream 型別
Dart 語言和庫透過 Future 和 Stream 物件,來提供會在當前呼叫的未來返回某些值的功能。以 JavaScript 中的 Promise 為例,在 Dart 中一個最終會返回 int 型別值的 promise,應當宣告為 Future<int>;一個會持續返回一系列 int 型別值的 promise,應當宣告為 Stream<int>。
讓我們用 dart:io 來舉另外一個例子。File 的同步方法 readAsStringSync()
會以同步呼叫的方式讀取檔案,在讀取完成或者丟擲錯誤前保持阻塞。這個會返回 String 型別的物件,或者丟擲例外。而與它等效的非同步方法 readAsString(),會在呼叫時立刻返回
Future<String> 型別的物件。在未來的某一刻,Future<String> 會結束,並返回一個字串或錯誤。
為什麼非同步的程式碼如此重要?
It matters whether a method is synchronous or asynchronous because most apps need to do more than one thing at a time.
大部分應用需要在同一時刻做很多件事。例如,應用可能會發起一個 HTTP 請求,同時在請求返回前對使用者的操作做出不同的介面更新。非同步的程式碼會有助於應用保持更高的可互動狀態。
非同步場景包括呼叫系統 API,例如非阻塞的 I/O 操作、HTTP 請求或與瀏覽器互動。還有一些場景是利用 Dart 的 isolate 進行計算,或等待一個計時器的觸發。這些場景要麼是在不同的執行緒執行,要麼是被系統或 Dart 執行時處理,讓 Dart 程式碼可以在計算時同步執行。
async-await 語法
async 和 await 關鍵字是用宣告來定義非同步函式和獲取它們的結果的方式。
下面是一段同步程式碼呼叫檔案 I/O 時阻塞的例子:
const String filename = 'with_keys.json';

void main() {
  // Read some data.
  final fileData = _readFileSync();
  final jsonData = jsonDecode(fileData);

  // Use that data.
  print('Number of JSON keys: ${jsonData.length}');
}

String _readFileSync() {
  final file = File(filename);
  final contents = file.readAsStringSync();
  return contents.trim();
}
下面是類似的程式碼,但是變成了 非同步呼叫:
const String filename = 'with_keys.json';

void main() async {
  // Read some data.
  final fileData = await _readFileAsync();
  final jsonData = jsonDecode(fileData);

  // Use that data.
  print('Number of JSON keys: ${jsonData.length}');
}

Future<String> _readFileAsync() async {
  final file = File(filename);
  final contents = await file.readAsString();
  return contents.trim();
}
main() 函式在呼叫 _readFileAsync() 前使用了 await 關鍵字,讓原生程式碼(檔案 I/O)執行的同時,其他的 Dart 程式碼(例如事件處理器)能繼續執行。使用 await 後,_readFileAsync() 呼叫返回的 Future<String> 型別也轉換為了 String。從而在將結果 content 賦予變數時,隱含轉換為 String 型別。
如下圖所示,無論是在 Dart VM 還是在系統中,
Dart 程式碼都會在 readAsString() 執行非 Dart 程式碼時暫停。在 readAsString() 返回值後,Dart 程式碼將繼續執行。

如果你想了解更多關於 async、await 和 Future 的內容,可以存取
非同步程式設計 codelab 進行學習。
Isolate 的工作原理
現代的裝置通常會使用多核 CPU。開發者為了讓程式在裝置上有更好的表現,有時會使用共享內容的執行緒來併發執行程式碼。然而,狀態的共享可能會 產生競態條件,從而造成錯誤,也可能會增加程式碼的複雜度。
Dart 程式碼並不在多個執行緒上執行,取而代之的是它們會在 isolate 內執行。每一個 isolate 會有自己的堆記憶體,從而確保 isolate 之間互相隔離,無法互相存取狀態。由於這樣的實現並不會共享狀態,所以 互斥鎖和其他鎖 以及 競爭條件 不會在 Dart 中出現。也就是說,isolate 並不能完全防止競爭條件。
在使用 isolate 時,你的 Dart 程式碼可以在同一時刻進行多個獨立的任務,並且使用可用的處理器核心。 Isolate 與執行緒和處理序近似,但是每個 isolate 都擁有獨立的記憶體,以及執行事件迴圈的獨立執行緒。
主 isolate
在一般場景下,你完全無需關心 isolate。通常一個 Dart 應用會在主 isolate 下執行所有程式碼,如下圖所示:
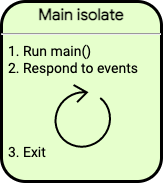
就算是隻有一個 isolate 的應用,只要透過使用 async-await 來處理非同步操作,也完全可以流暢執行。一個擁有良好效能的應用,會在快速啟動後儘快進入事件迴圈。這使得應用可以透過非同步操作快速響應對應的事件。
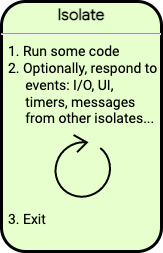
Isolate 的生命週期
如下圖所示,每個 isolate 都是從執行 Dart 程式碼開始的,比如 main() 函式。執行的 Dart 程式碼可能會註冊一些事件監聽,例如處理使用者操作或檔案讀寫。當 isolate 執行的 Dart 程式碼結束後,如果它還需要處理已監聽的事件,那麼它依舊會繼續被保持。處理完所有事件後,isolate 會退出。
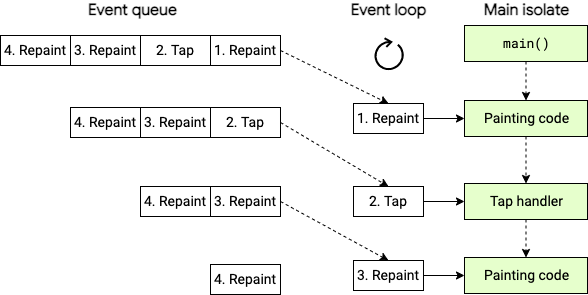
事件處理
在客戶端應用中,主 isolate 的事件佇列內,可能會包含重繪的請求、點選的通知或者其他介面事件。例如,下圖展示了包含四個事件的事件佇列,佇列會按照先進先出的模式處理事件。

如下圖所示,在 main() 方法執行完畢後,事件佇列中的處理才開始,此時處理的是第一個重繪的事件。而後主 isolate 會處理點選事件,接著再處理另一個重繪事件。
如果某個同步執行的操作花費了很長的處理時間,應用看起來就像是失去了響應。在下圖中,處理點選事件的程式碼比較耗時,導致緊隨其後的事件並沒有及時處理。這時應用可能會產生卡頓,所有的動畫都無法流暢播放。
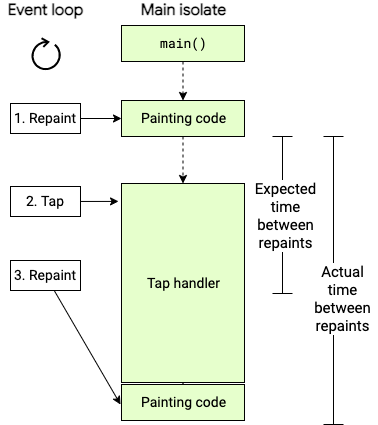
在一個客戶端應用中,耗時過長的同步操作,通常會導致 卡頓的動畫。而最糟糕的是,應用介面可能完全失去響應。
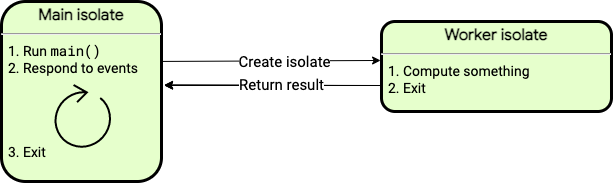
後臺執行物件
如果你的應用受到耗時計算的影響而出現卡頓,例如 解析較大的 JSON 檔案,你可以考慮將耗時計算轉移到單獨工作的 isolate,通常我們稱這樣的 isolate 為 後臺執行物件。下圖展示了一種常用場景,你可以產生一個 isolate,它將執行耗時計算的任務,並在結束後退出。這個 isolate 工作物件退出時會把結果返回。
每個 isolate 都可以透過訊息通訊傳遞一個物件,這個物件的所有內容都需要滿足可傳遞的條件。並非所有的物件都滿足傳遞條件,在無法滿足條件時,訊息傳送會失敗。舉個例子,如果你想傳送一個 List<Object>,你需要確保這個列表中所有元素都是可被傳遞的。假設這個列表中有一個 Socket,由於它無法被傳遞,所以你無法傳送整個列表。
你可以查閱 send() 方法 的文件來確定哪些型別可以進行傳遞。
Isolate 工作物件可以進行 I/O 操作、設定定時器,以及其他各種行為。它會持有自己記憶體空間,與主 isolate 互相隔離。這個 isolate 在阻塞時也不會對其他 isolate 造成影響。
程式碼範例
本節將重點討論使用 Isolate API 實現 isolate 的一些範例。
實現一個簡單的 isolate 工作物件
These examples implement a main isolate
that spawns a simple worker isolate.
Isolate.run() simplifies the steps behind
setting up and managing worker isolates:
- Spawns (starts and creates) an isolate
- Runs a function on the spawned isolate
- Captures the result
- Returns the result to the main isolate
- Terminates the isolate once work is complete
- Checks, captures, and throws exceptions and errors back to the main isolate
Running an existing method in a new isolate
主 isolate 的程式碼如下:
const String filename = 'with_keys.json';

void main() async {
  // Read some data.
  final jsonData = await Isolate.run(_readAndParseJson);

  // Use that data.
  print('Number of JSON keys: ${jsonData.length}');
}
The spawned isolate executes the function
passed as the first argument, _readAndParseJson:
Future<Map<String, dynamic>> _readAndParseJson() async {
  final fileData = await File(filename).readAsString();
  final jsonData = jsonDecode(fileData) as Map<String, dynamic>;
  return jsonData;
}-
Isolate.run()spawns an isolate, the background worker, whilemain()waits for the result. -
The spawned isolate executes the argument passed to
run(): the function_readAndParseJson(). -
Isolate.run()takes the result fromreturnand sends the value back to the main isolate, shutting down the worker isolate. -
The worker isolate transfers the memory holding the result to the main isolate. It does not copy the data. The worker isolate performs a verification pass to ensure the objects are allowed to be transferred.
_readAndParseJson() is an existing,
asynchronous function that could just as easily
run directly in the main isolate.
Using Isolate.run() to run it instead enables concurrency.
The worker isolate completely abstracts the computations
of _readAndParseJson(). It can complete without blocking the main isolate.
The result of Isolate.run() is always a Future,
because code in the main isolate continues to run.
Whether the computation the worker isolate executes
is synchronous or asynchronous doesn’t impact the
main isolate, because it’s running concurrently either way.
For the complete program, check out the send_and_receive.dart sample.
Sending closures with isolates
You can also create a simple worker isolate with run() using a
function literal, or closure, directly in the main isolate.
const String filename = 'with_keys.json';

void main() async {
  // Read some data.
  final jsonData = await Isolate.run(() async {
    final fileData = await File(filename).readAsString();
    final jsonData = jsonDecode(fileData) as Map<String, dynamic>;
    return jsonData;
  });

  // Use that data.
  print('Number of JSON keys: ${jsonData.length}');
}
This example accomplishes the same as the previous. A new isolate spawns, computes something, and sends back the result.
However, now the isolate sends a closure.
Closures are less limited than typical named functions,
both in how they function and how they’re written into the code.
In this example, Isolate.run() executes what looks like local code, concurrently.
In that sense, you can imagine run() to work like a control flow operator
for “run in parallel”.
實現一個簡單的 isolate 工作物件
Isolate.run() abstracts a handful of lower-level,
isolate-related API to simplify isolate management:
You can use these primitives directly for more granular
control over isolate functionality. For example, run() shuts
down its isolate after returning a single message.
What if you want to allow multiple messages to pass between isolates?
You can set up your own isolate much the same way run() is implemented,
just utilizing the send() method of SendPort in a slightly different way.
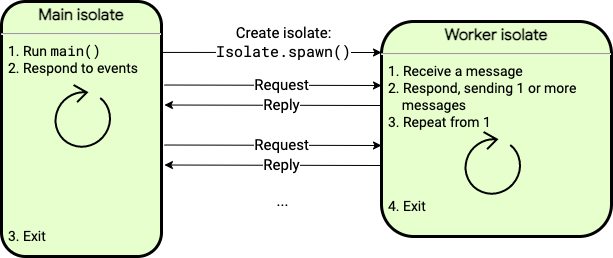
如果你想在 isolate 之間建立更多的通訊,那麼你需要使用
SendPort 的 send() 方法。下圖展示了一種常見的場景,主 isolate 會發送請求訊息至 isolate 工作物件,然後它們之間會繼續進行多次通訊,進行請求和回覆。
你可以看看 long_running_isolate.dart 範例,它展示瞭如何產生持久的 isolate,用於在 isolate 之間反覆傳送和接收訊息。
效能和 isolate 組
當一個 isolate 呼叫了 Isolate.spawn(),兩個 isolate 將擁有同樣的執行程式碼,並歸入同一個 isolate 組 中。
Isolate 組會帶來效能最佳化,例如新的 isolate 會執行由 isolate 組持有的程式碼,即共享程式碼呼叫。同時,Isolate.exit() 僅在對應的 isolate 屬於同一組時有效。
某些場景下,你可能需要使用 Isolate.spawnUri(),使用執行的 URI 產生新的 isolate,並且包含程式碼的副本。然而,spawnUri() 會比 spawn() 慢很多,並且新產生的 isolate 會位於新的 isolate 組。另外,當 isolate 在不同的組中,它們之間的訊息傳遞會變得更慢。
Concurrency on the web
All Dart apps can use async-await, Future, and Stream
for non-blocking, interleaved computations.
The Dart web platform, however, does not support isolates.
Dart web apps can use web workers to
run scripts in background threads
similar to isolates.
Web workers’ functionality and capabilities
differ somewhat from isolates, though.
For instance, when web workers send data between threads, they copy the data back and forth. Data copying can be very slow, though, especially for large messages. Isolates do the same, but also provide APIs that can more efficiently transfer the memory that holds the message instead.
Creating web workers and isolates also differs.
You can only create web workers by declaring
a separate program entrypoint and compiling it separately.
Starting a web worker is similar to using Isolate.spawnUri to start an isolate.
You can also start an isolate with Isolate.spawn,
which requires fewer resources because it
reuses some of the same code and data
as the spawning isolate.
Web workers don’t have an equivalent API.